Cinnamon Rolls Recipe
So hands up, this is definitely not a healthy meal or treat at all. But, how could anyone even think of cutting cinnabon style cinnamon rolls out of their lives?! Are they okay? We have a few memories of cinnabons together and each makes us smile, so recreating the dish was the obvious thing to do.

We will state that cinnamon rolls are a once in a while treat. As a positive mental approach to food and wellbeing, we encourage you to make those treats you love. Don’t shy away! We always hope that people may even try to create healthier versions of our treats where we haven’t been able to yet!
As long as you feed your body healthy, wholesome food that consists of ingredients that grow in the ground, on trees, plants and some protein, you’re good, and should definitely look for some indulgence in your life.
When baking these cinnamon rolls, the house fills with the delicious baked cinnamon aroma. It’s wonderful and homey and it definitely sets you in the mood for those babies to come out the oven! With this smell wafting in your house, it will push all thoughts about feeling guilty right out of your head!
What is a Cinnabon?
Well … if you truly don’t know what a Cinnabon is, then we are truly sorry. Essentially, a Cinnabon is cinnamon roll is made up of three parts; the dough, the filling and the icing.
If you have a stand mixer the dough is pretty quick and easy to make. The yeast in the recipe is the most tricky part of the roll. We’ve given a bit more information on how the yeast could trip you up in this recipe below.
The filling is very open to play with. We like to use darker sugars to compliment the cinnamon and in this recipe we’ve used half light brown sugar and dark brown sugar. The combination of these two sugars reminded us the most of the Cinnabon classic you get. Or opt for whatever sugar you have to hand. If you are looking for a lighter version, opt for coconut oil and coconut sugar in the filling. Although in the grand scheme of things, it might not make that much of a difference, it’s still nice to take those healthier steps where we can.


Yeast
So yeast can sure be a little tricky to work with. We’ve listed a couple of notes and tips when working with yeast in this recipe. The one issue when working with yeast is the dough rising. If the dough doesn’t rise then your dough isn’t usable.
Check to ensure your yeast has not yet expired. We always recommend testing the yeast before starting the recipe. We do this by adding the yeast to our warm milk mixture, if it gets foamy, your yeast is good to go! If after dissolving the yeast in the warm milk, the yeast didn’t start to froth up, do not continue with the rolls, your dough will not rise.

-

- frothed yeast
As mentioned in tips, make sure your milk is not too hot or it could kill the yeast which will cause your dough not to rise at all. The ideal temperature for the milk should be between 41 C and 43 C for proofing. While 35 C is the best temperature for yeast to multiply, that’s not warm enough for proofing active dry yeast.
For further information about all things yeast related, check out our Yeast ingredient guide for details on different yeast types, storage, proofing and testing yeast.
Pre Prepared Cinnamon Rolls
What’s great about this recipe is that it allows you to be on job and prep basically everything the day before! Say if you want them as a morning treat, simply follow the method up until step 13, wrap tightly with cling film and place in the fridge until you’re ready to bake them in the morning; the rolls should continue to rise in the fridge overnight.
Can You Freeze Cinnamon Rolls?
This recipe is also great because you can also freeze the dough if you happen to make a large batch – like we did in our cooking class. We ended up with three different cinnamon roll doughs! Of course we couldn’t waste any of this precious dough so we simply carried on preparing the rolls up until step 13. We then tightly wrapped our last tray with cling film and placed it in the freezer. The dough can stay in the freezer for up to 6 weeks. Simply defrost the frozen cinnamon rolls in the fridge overnight when ready to use.
Tips
Working with yeast
We definitely recommend checking if your yeast is active before starting this recipe. Luckily, we’ve integrated this into the first step of the method, so you won’t be wasting or prepping unnecessarily if you aren’t ready to go with the recipe!
When warming the milk to pour the yeast mixture in, be careful not to overheat your milk. When you use milk that is too hot to activate your yeast, you open the issue of killing your yeast. This will then prevent your dough from rising, resulting in a thick dense dough. Make sure your milk is between 36.5 to 43 C.
Above we have said to make sure your milk doesn’t get too hot, but we like to make sure it is more on the warmer end to help the yeast dissolve. If your yeast doesn’t dissolve properly then you may see some lumps in your kneaded dough.
Preparing your cinnamon roll ingredients in advance
Although not an absolute necessity, we advise using room temperature butter for the recipe. Mainly the filling and the icing – it makes it easier to whip and handle. Remember to take the butter out of the fridge a few hours before you plan to make the dough to give it enough time to soften. If you find your butter is still quite firm when making the dough; weigh out how much you need and slowly warm in the oven for about 15 seconds. It’s okay if some of it is a bit melted.
-

- 1. Roll out proofed dough to about 12×16 inches
-

- 2. Distribute your cinnamon sugar filling
-

- 3. Gently spread all over dough, right until the edges
-

- 4. Roll horizontally into a log
-
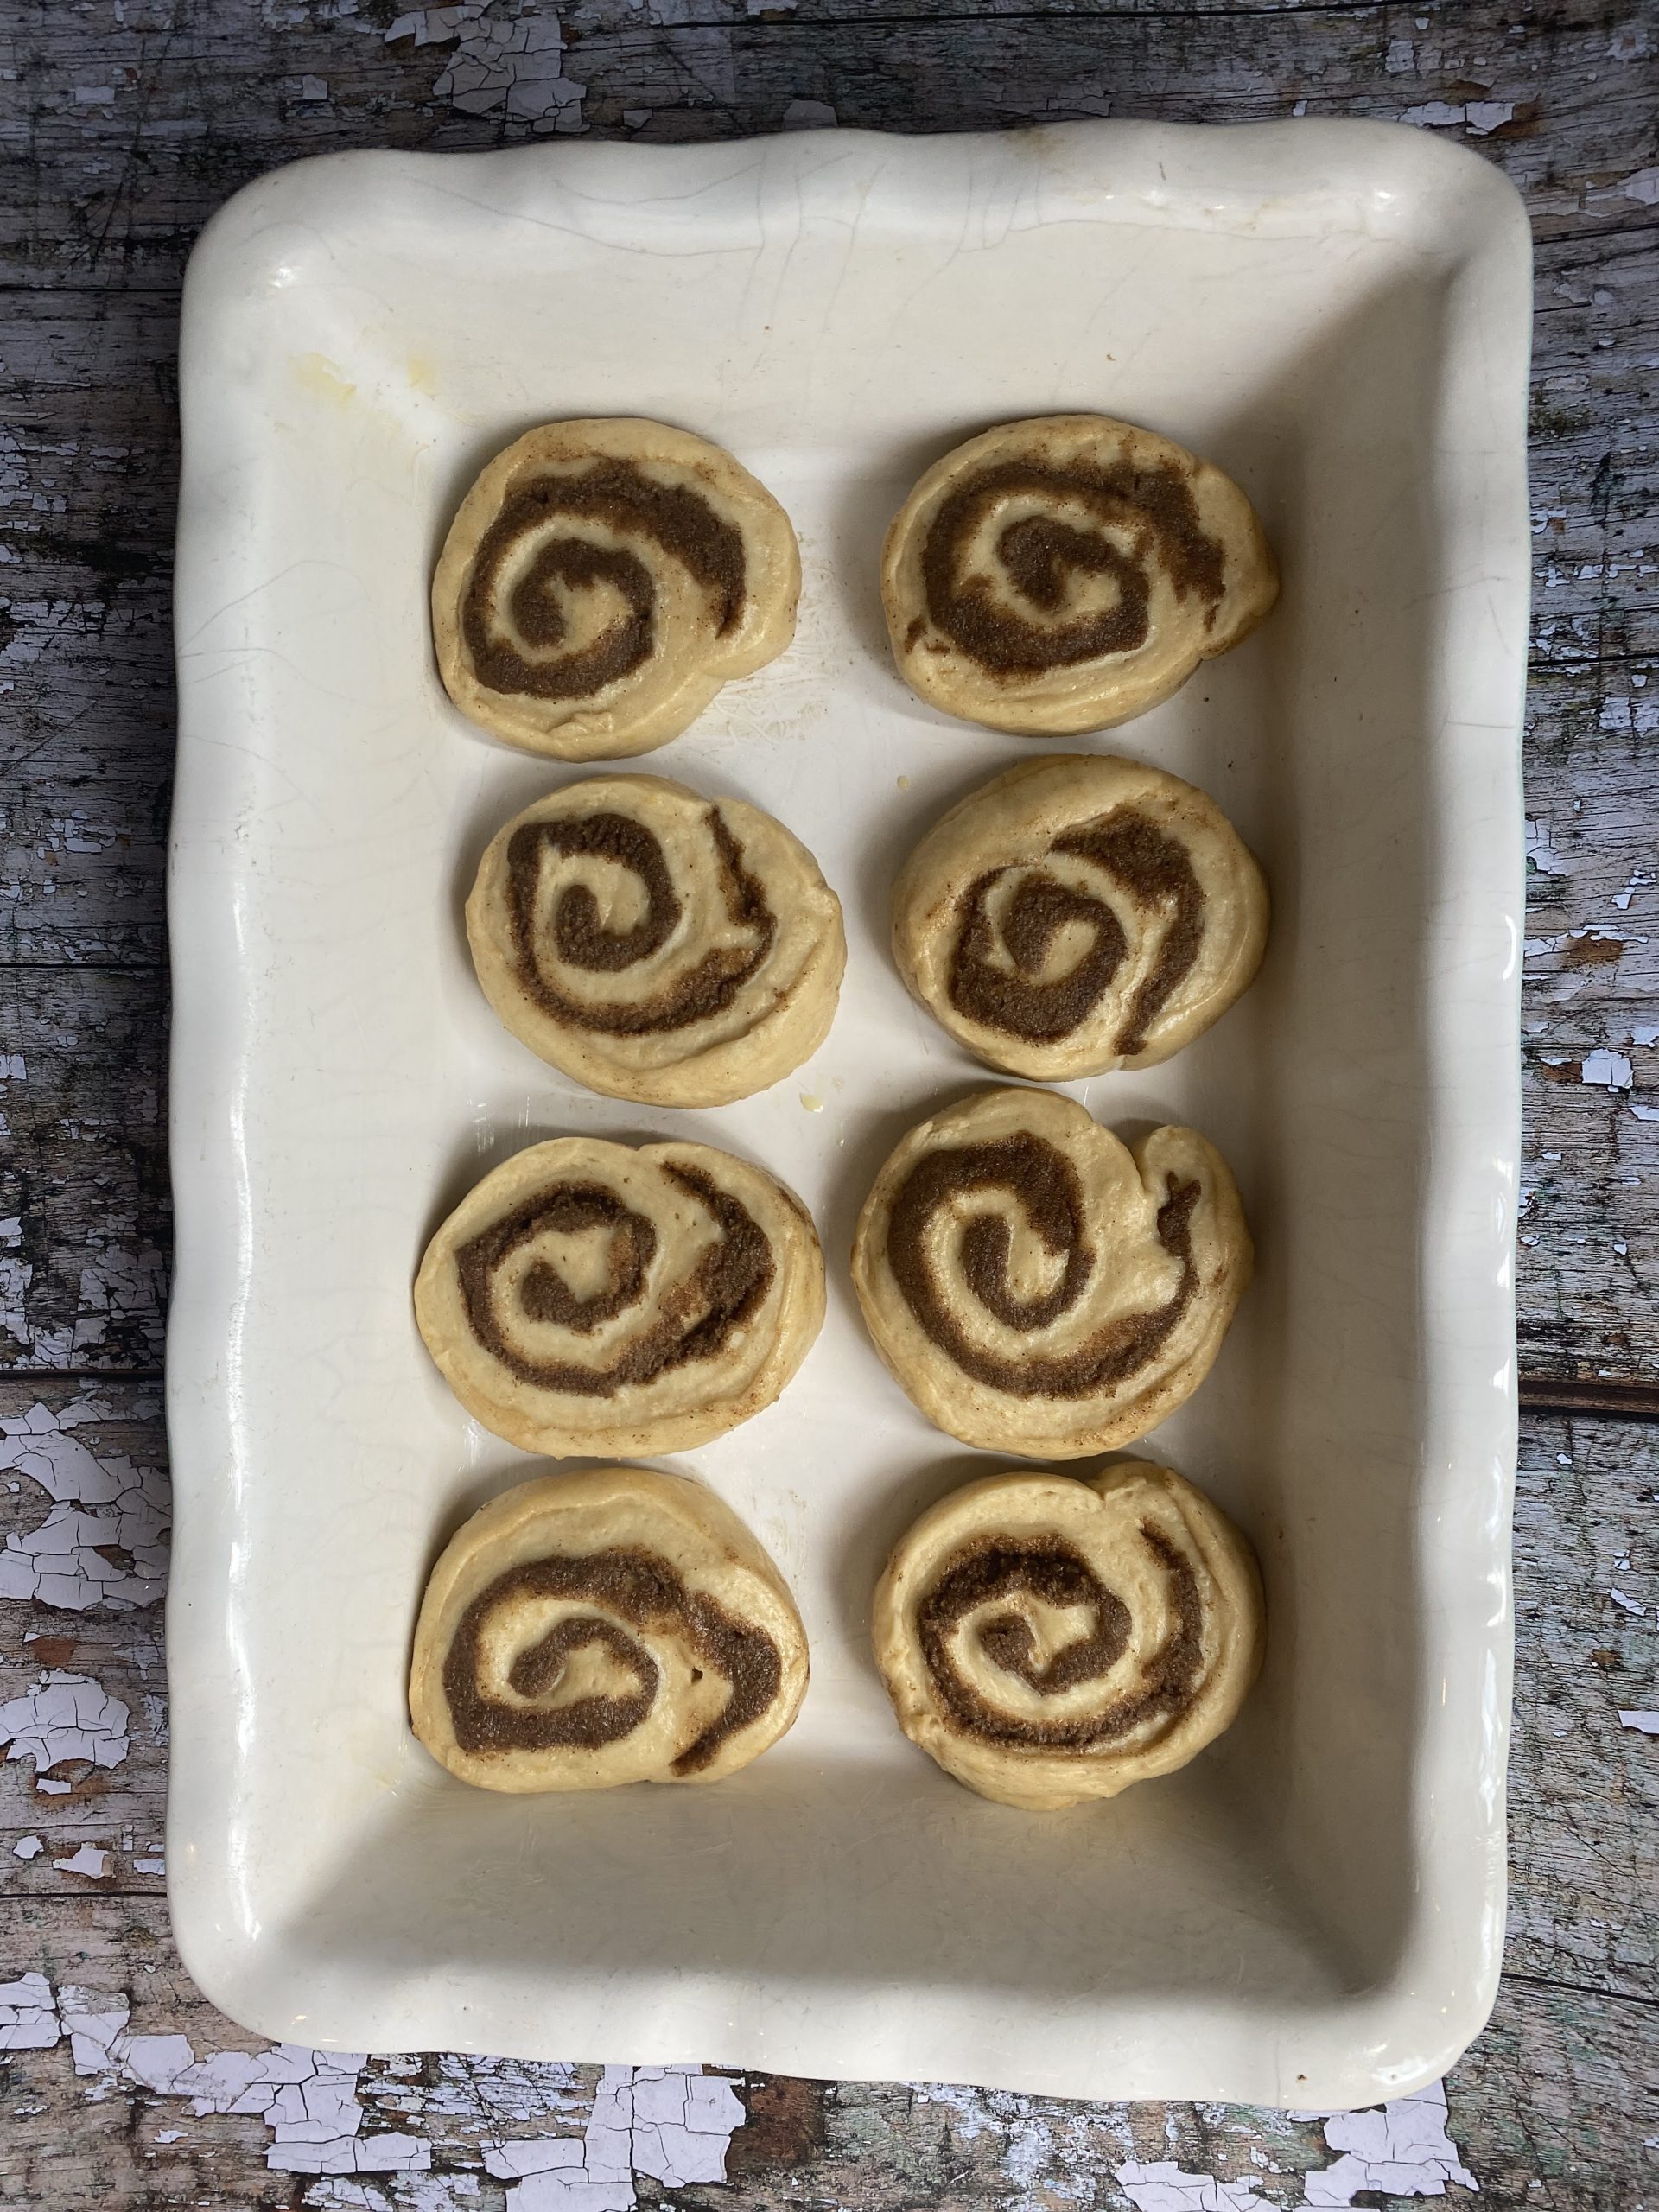
- 5. Cut into equal slices and place in an oiled tray or dish
Cinnamon roll servings
So these rolls are pretty large – thank you very much yeast – you’ll 100% feel stuffed after one. Feel free to change up the sizing on the rolls. We’ve roughly rolled out the dough to 15×12 inches and cut 12 rolls, not trimming off the ends. You can of course cut thinner slices into your log and make small mini cinnamon rolls. Or double up on the thickness and go true to the classic big and tall cinnabon roll; you’ll get about 6 large rolls.

| Prep Time | 30 minutes |
| Cook Time | 25 minutes |
| Passive Time | 4 hours |
| Servings |
rolls
|
- 500 g plain flour plus 4-5 Tbsp
- 85 g butter room temperature
- 2 tsp salt
- 300-400 ml whole milk
- 3 1/2 tsp active yeast
- 1 large egg
- 1 egg yolk
- 100 g granulated sugar
- 100 g light brown sugar
- 100 g dark brown sugar
- 80-90 g butter
- 3 tbsp cinnamon
- 180 g cream cheese
- 90 g butter
- 1 tsp vanilla extract
- 100-120 g icing sugar
- 2 tsp cinnamon optional
Ingredients
Rolls
Filling
Icing
|
|
- Heat milk until lukewarm to activate the yeast; measure out the milk into a saucepan and place on the heat then gently bring to a boil. The milk should not be higher than 47 degrees celsius nor lower than 40 degrees celsius.
- Once milk has come to temperature, remove from heat and add yeast and 1 tsp of granulated sugar. Gently dissolve the yeast in the warm milk and set aside for 10 minutes or so. You may need to get a fork and gently whisk to ensure the yeast dissolves. The above steps are vital to test your yeast. See recipe notes and blog post for more information. If your yeast milk mixture starts to froth and foam, your yeast is okay to use.
- Grab your bowl from your stand mixer* and measure out 500g of plain flour. Add in the egg and yolk, remaining sugar, butter and salt. Hand mix to combine.
- Fit the stand mixer bowl into the machine and attach the paddle or dough hook attachment. Once the milk has sat aside for 10 minutes, slowly start to pour the milk into the flour mixture whilst the stand mixer is on high.** We normally never use all of our milk mixture, we use enough of it to combine the flour we’ve used into a dough. It shouldn’t be too wet, shouldn’t stick to the sides of the bowl but is sticky enough to touch and stick to the bottom.
- If your dough is wet, this is where you add in your additional tablespoons of flour. We normally end up adding in about 4-5 tablespoons, you may need more or less. So go by touch and sight. We want to be careful to not add too much flour as we don’t want a heavy and dense dough.*** What you’re looking for is a soft, smooth dough ball that should cling to the stand mixer hook.
- Allow the machine to do most of the work to combine the dough. You may need to hand knead it for a couple minutes to get excess flour in the bowl incorporated and smoothen out the dough.
- Oil a clean large bowl and place dough inside. Cover with a towel or cling film and place aside for 1-2 hours till the dough rises or doubles in size.
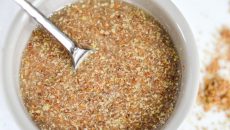
- Whilst the dough is resting, start work on your cinnamon filling. Using soft butter that has come to room temperature, whip up and add in cinnamon and sugars. Mix to combine and place aside.
- Once the dough has rested and you're happy with the rise, tip onto a clean surface. You can roll out the dough on a wooden surface for ease. Spread out your cinnamon filling mix onto the rectangle dough. Get as close to the borders as you can so you don’t have any rolls without cinnamon goodness.
- Start rolling the bottom of the dough horizontally upwards, creating one long log. Try and keep the roll as tight as you can. We roll the dough out to approximately 13x16inches.
- Once the dough has been rolled, you can start cutting up the log to create individual rolls, roughly 1 ½ inch thick or 12 equally sized rolls. It’s completely up to you whether you want to cut the ends off. We like to keep them so we don't waste any of the goodness that is to be.
- Preheat the oven 160 degrees (fan oven). Oil a large baking tray - large enough to fit your rolls with space between each roll. You may need to use more than one tray here.
- Place your cut rolls into the greased pan with about 1-2cm space surrounding each roll. They don’t need a large amount of space as we will set aside for a second proof, which allows the dough to rise further. You only need to wait half an hour minimum but are also welcome to let them proof overnight.
- Once the dough has proofed the second time, place in the oven for 20 minutes.
- Whilst the rolls are cooking, we’ll start on the icing. If your butter is room temperature, you should be able to beat all the ingredients together until combined, and voila, your icing is done.
- Once the rolls are ready, spread the icing generously across the tops of all the rolls. We recommend serving warm so the icing melts and oozes over the roll a little.
Handy Equipment
- Stand Mixer
*If you are not using a stand mixer, the process will take longer as you will manually have to knead the dough by hand.
** Pour the milk in stages; you may not need all of it. Pouring the milk in three separate intervals allows you to see when the flour and milk combines together.
***In this recipe we work with having extra measurements of the ingredients available. If you finish all your milk mixture and end up adding more flour, it just means you’ll end up with more dough! So, no harm no foul, at all.
****You can cut thicker slices for 6 large rolls or even smaller slices for mini cinnamon rolls.